Wednesday 19 February 2014

13.7 Laser Eye Surgery - Simran and Hareda

Laser eye surgery is a surgery in which a laser reshapes the cornea to improve vision.

As we learned in 13.6, the cornea of the eye is a transparent bulge in top of the eye that causes light to converge. The lens also causes light to converge, though the converging in mainly done through the cornea.


Vision problems can occur when you have a weak lens-cornea combination that is too weak or a lens-cornea combination that is too strong. The problems are hyperopia (far-sightedness) and myopia (near-sightedness). These two problems occur when light from objects focus behind the retina or in front of the retina instead of at the retina. Thus a person with hyperopia or myopia can't focus on objects at every distance.


Laser eye surgery is also used to correct the vision of those who have astigmatism. Astigmatism is an eye condition in which your eye is not completely round creating refractive errors. You can click here for more information on astigmatism as we haven't talked about it in class.


Recently laser eye surgery has also been used to correct presbyopia, an eye  condition which is a normal part of aging and makes focusing on near by objects difficult.


The Excimer laser is most often used for the procedure. This laser produces a ultraviolet light that vaporizes tissue, thus altering the shape of the cornea.

Excimer laser

There are different types of laser eye procedure a person can have done. LASIK (Laser Assisted in situ Keratomileusis) and PRK (Photo-Refractive Keractectomy) are the most commonly used laser eye procedures in Canada. Two other more recent procedures are LASEK (Laser Epithelial Keratomileusis) and Epi-LASIK.

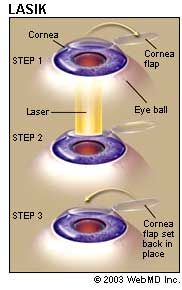
In all procedures the outer layer of the cornea, called the epithelium, or a flap of the cornea is cut and the laser removes enough tissue to reshape the cornea. The flap is then placed back where it previously sat. Depending on the procedure it can take 1-2 weeks to heal (less if you use LASIK). 


There are some risks to laser eye surgery. These risks vary depending on the procedure used. Risks include:
  • Pain
  • Hazy Vision
  • Dry Eyes
  • A poor quality of night vision
  • Corneal Ectasia
  • Regression
  • Corneal Infection
Depending on a persons lifestyle or certain conditions they may face, the risks of laser eye surgery could significantly increase.

What people don't realise is that getting laser eye surgery does not permanently erase your need for glasses or contacts as your eyes change as you grow older.

For more information click here.

Even though laser eye surgery poses many risks there is said to be a success rate of 95%.

If you are interested in how the procedure takes place than you can click here (LASIK) or here (PRK). You can also watch the real life experience of two people undergoing LASIK eye surgery here (turn on annotations) and here. If you are interested in the side effects of laser eye surgery you can click here to watch a video of someone who believes that they were tricked into getting the procedure and are now adamantly against it (note: he quite obviously didn't do his research).


Tuesday 18 February 2014

13.3 Images in Lenses

  13.1 Images in Lenses


In this chapter i have learnt many new and amazing things about Images with Lenses. 

As you may noticed that there are 2 things that affect the characteristics of the images formed. The kind of lens where there are Converging and Diverging and the location of the object. As you know, you can find an images characteristics by drawing ray diagrams. Just like you did with Converging and Diverging mirrors. In order to find an image, you know that there has to be two light rays to locate the image. Basically everything i have noted down here; you already know. The only difference is that with mirrors your considered reflected rays, and with Lenses you consider Refracted Rays

Refracted Ray - It is the change or bending in direction of light when it travels from one medium to another.


This is a perfect example of a refraction.>>

List of Examples for Refraction < Click to watch
If you want to know how to draw ray diagrams for lenses, it is important to know how the incident and Emergent rays are related to each-other. The Emergent Ray is the ray that leaves the lens, being refracted as it goes from the lens back into the air.


This is an example of an emergent ray.As you can see here, when an incident ray goes through a thick lens the emergent ray is refracted. If the ray goes through a thin lens, you don't really see a difference.


Another amazing way to understand how lens work is, by using a rectangular prism.


^^From this picture above, an incident ray directed at a rectangular glass prism undergoes two refraction's. The first is at air- glass boundary, as the ray enters the prism, and the second is at the glass- air boundary when the ray emerges from the prism. If we look at this prism in a 3-Dimensional way, there are two sides of the prism. And when light passes through these two boundaries, they are parallel to each other. All in all the sideways displacement depends on the thickness of the prism.
Light through a Prism click on this link to see how light works with prisms!! 

How to Locate the Image in a Converging Lens 


Basically there are three imaging rules for a converging lens.

As you can see here, to find an image through a Converging Lens, you have to follow three simple steps:  Ray 1 goes parallel to the principal axis and refracts through the principal focus. Ray 2, goes through the secondary principal and is refracted parallel to the principal axis. And ray 3, is not needed but if you want an accurate image, it would go through the optical center and continues its way on straight without being refracted. If you are wondering why Ray 3 goes right through the Optical center, it is because the middle part of the lens acts like a very thin rectangular prism with no noticeable sideways displacement.


You can investigate images in a converging lens by placing a candle at a distant greater that 2F', you can locate an image of this source by moving a paper screen back and forth oh the other side of the lens. 

These are different characteristics of an Image in Converging Lenses
Object between F' and 2F'
   Larger                                     
 Inverted                                 
Beyond 2F                            
Real                                      
                                
Object beyond 2F'


  • Smaller                                       
  • between F and 2F                       
  • Inverted                                      
  • Real                                            


Object at 2F'                                                              


- Same size                                                                 
 - Inverted                                                                     
 - At 2F                                                                         
 - Real                                                                         

Quick Video to learn how to locate an image in converging lens


When an object is located beyond 2F', the image is smaller that the object and is between 2F and F. As you gradually move the object closer towards the lens, the image gets larger and larger.When it comes to a point where the object and the image is the same size, the object will be located at 2F'; the image is now laced at 2F. When it keeps continuing the object will be between 2F' and F', you get a larger image than the object.

REMEMBER !! - For all these image positions, the image is always inverted and real.

THAT WAS ALL FOR CONVERGING !!
DON'T WORRY , WERE NOT DONE HERE!!


How to Locate the Images in Diverging Lenses

The imaging rules for a diverging lens are quite similar to the converging lens. The only difference is that the light rays do not actually come from the principal focus; they only appear to.


As you can see here Ray1 goes parallel to the principal axis and is refracted as if it had come through the principal focus. Ray 2 appears to pass through the secondary principal focus and is refracted parallel to the principal axis. And Ray 3 passes through the center continues straight through on its path. All of the rays never meet, but what diverging lens do is they extend the refracted rays backwards. Where those rays meet is where a new image is formed.


Click on this video to learn how to locate images in Diverging Lens

Remember that  Diverging Lens always produce the same image characteristics no matter where the object is placed. It is always , smaller, upright, virtual and on the same side of the lens as the object!

IN SUMMARY

  • A CONVERGING LENS PRODUCE BOTH REAL AND VIRTUAL IMAGES. THE SIZE WILL VARY DEPENDING ON THE WHERE THE OBJECT IS PLACED!!
&
  • A DIVERGING LENS ALWAYS PRODUCES A SMALLER,UPRIGHT,VIRTUAL IMAGE!!


If your serious about learning more things on Diverging Lens and Converging Lens. Please visit these sites. 


http://www.guesspapers.net/621/refraction-of-light-and-optical-instruments/

Watch these videos as well. !! :D

http://www.youtube.com/watch?v=PjuDjJzdf8w

http://www.youtube.com/watch?v=OSUGRvYwxw8

http://www.youtube.com/watch?v=nyEa6oB59_Y


Kevin Fernando


Saturday 15 February 2014

13.1 Lenses and the Formation of Images
Two important lenses that need to be known in this chapter are: Converging lens and Diverging lens
But first off lets start with the definitions of both types of lenses.

Converging lens: This type of lens is thickest in the middle which allows incident parallel light rays to converge through a single point after refraction.

Converging Lens!!!
Diverging lens: This type of lens is thinnest in the middle and that causes incident parallel light rays to diverge (spread apart) after refraction takes place.

It is important that you understand the difference between a Converging Lens and a Diverging Lens. In a converging lens after the parallel light rays pass through the converging lens they all converge (come together) in a single point after refraction takes place. Meanwhile in a Diverging Lens when the parallel light rays pass through the lens they all diverge( separate from each other) after refraction takes place. Also notice how the shapes of the lenses are different.

Simplifying the Path of Light Rays Through a Lens

A helpful tip when drawing rays being refracted in a converging lens is by first drawing a dashed vertical line through the center of the lens. Once you make a dashed line you can imagine a ray going towards the central line and then stopping there and then on the other side of the dashed line make a new line (which is continues) started from your last line and make it look refracted. You can use this helpful tip for both converging and diverging lenses.

The Terminology of Converging Lenses

  • Center of lens is called Optical Center(O)
  • The line that goes through the optical center which is perpendicular to the "dashed line" located in the center of the lens is called the Principal Axis
  • Light rays parallel to the principal axis converge through a single point on the principal axis called the principal focus
  • Secondary principal focus is labelled (F')

The Terminology of Diverging Lenses

  • Unlike the converging lens, when light rays that are parallel to the principal axis of a diverging lens DO NOT converge but diverge instead
  • If you look at the diverging rays, and you continue the lines, looking backwards it appears as though it came from the virtual focus which is now identified as the principal focus (F)
  • The secondary principal focus(F) is located on the other side of the lens which is where the rays diverge
  • Remember that the principal focus (F) and the secondary principal focus (F') are equally far apart from the optical center, this applies for both converging and diverging lenses

Key Notes:

  • Difference between converging and diverging are in a converging lens the parallel light rays comes together in one point after refraction, but in diverging lenses parallel light rays diverge (spread apart) after refraction
  • In a converging lens the principal focus is located on the OPPOSITE side of the lens as the incident rays
  • In a diverging lens the principal focus is located on the SAME side of the lens as the incident rays
  • A useful tip when drawing the path of light rays through a line, is to make a dashed line in the centre of lens, that way it is easier to make a refracted ray
  • Optical Center is identified as "O"
  • Principal focus is identified as "F"
  • Secondary Principal Focus is identified as "F'|
  • In a converging lens the principal focus is located at the opposite side from the incident rays

  • In a diverging lens the principal focus is on the same side of the incident ray


Friday 7 February 2014

Lens Applications- 13.5                                              James Kovacs and Jack Learoyd

 So far we have learnt about what a lens is and how it affects light rays when they pass through it; however, we do not know why or how lenses are used, we live in a world of lenses. Lenses are used in many everyday objects such as glasses, cameras and even your own eyes as well as some objects not seen so commonly outside of a classroom or movie theatre such as telescopes, microscopes, and projectors.

To learn more about lenses visit: http://science.howstuffworks.com/lens-info.htm

Cameras 
Lenses are used in cameras to magnify the object that is being photographed. Camera lenses achieve this by how much they are curved(how far out the centre of the lens is). The more bent the lens is the more acute the bending angle becomes. If the bending angle is acute the light rays will make a sharper bend, converging closer to the lens. Consequently a flatter lens will allow the light rays to converge farther away from the lens, if a lens is rounder it will produce a smaller image. If the distance between the real image and the lens is increased the real image will get bigger because the light rays spread out more.
To learn more about Cameras visit: http://electronics.howstuffworks.com/camera2.htm

Movie Projector
The projector is the opposite of a camera because it takes a small object(the film) and projects it on to a big object(the screen) because of this film needs to be placed between F' and 2F'. Since the lens used in a projector creates an inverted image the film needs to be
loaded in upside down so that the image on the screen is seen upright. Projectors create an upright, inverted, real image.
To see how a Projector works visit: http://entertainment.howstuffworks.com/movie-projector.htm


Magnifying Glass
Lenses are also used in magnifying glasses. A magnifying glass is probably the most simple use for a lens as it is basically a converging lens attached to a handle. As you would expect, a magnifying glass behaves exactly like a converging lens. When the object you are trying observe is placed on the opposite side of the lens in comparison to your eyes the result will be you seeing a larger, upright, virtual image. This can be extremely helpful for people with bad eyesight who needs to read fine print, a diagram can be seen below on how a magnifying glass produces a larger image. Another place you can see magnifying glasses are at camp fires. This is because it concentrates light rays from the sun creating high temperatures which if concentrated on a dry leaf or piece of wood will create a fire. Here is a good video on how a magnifying glass works. The terminology is a bit more advanced than what we have learned but it still describes how a magnifying glass and lenses in general work.

To learn more about Magnifying glass visit: http://www.ehow.com/how-does_4567139_magnifying-glasses-work.html

The Compound Microscope
The Compound Microscope is made up of two converging lenses and it produces two enlarged, inverted images. One of these images are real and one is virtual. The real image that is formed is produced by the objective lens and is not seen because it is in the body tube of the microscope. The body tube is located between the objective and the eye piece lenses. The virtual image is created by the eyepiece lens, this image is the larger image that you do see.
To learn more about compound microscopes visit: http://www.youtube.com/watch?v=09nBsidXs0g

The Refracting Telescope
The Refracting Telescope is a shares some characteristics with the compound microscope. The difference is that the object is much farther away. The object is so far beyond 2F' that incident rays passing through the objective lens are considered parallel. This telescope produces two enlarged and inverted images. Like the compound microscope one image is real which is not seen (inside tube of the telescope) and one larger virtual image that is seen. Unfortunately because of gravity there is a size limit on refracting telescopes. If the objective lens is to large, it will begin to slightly droop under its own weight which will create distorted images. The largest refractor in the world has a diameter of 1.02 m and is called the Yerkes telescope. Images created with refracting telescopes are inverted, this is not a problem when viewing distant stellar objects. However this cal be a problem if you are viewing images on earth. If you wish to view images on Earth you will need a terrestrial telescope which has a third converging lens between the objective lens and the eye piece. This extra lens corrects the inverted image and allows you to always see the upright image.
To learn more about telescopes visit: http://science.howstuffworks.com/telescope1.htm
To learn more about the Yerkes telescope visit: http://amazing-space.stsci.edu/resources/explorations/groundup/lesson/scopes/yerkes/

Thursday 23 January 2014

12.5 Total Internal Reflection


12.5 Total Internal Reflection

Today in class we learned about total reflection. This is when we cannot see the refracted image, and only see the reflected image. Here is example of it occurring in real life.
We get total internal reflection when the angle of incidence is either at or greater than the critical angle. The critical angle is the angle of incidence that results in an angle of refraction of 90º. For example the critical angle of water is 49º. This means that if you have an incident ray of 49º or higher, total internal reflection will occur. Like everything in life conditions must be met for this to work. The 2 conditions are that light must be travelling more slowly in the first median than in the second, and the angle of incidence is large enough that no reflection occurs. There is a diagram showing how this works. 
There is an easy and simple way to figure out the critical angle, without just experimenting for who knows how long. You simply use Snell's general equation we learned. In this case the angle of refraction is 90º making sin0R=1.n1 would be the more refractive medium, and n2 would be the less refractive median. You are looking for the critical angle or 0C (angle of incidence) the formula will look a little like this.
Diamonds are an excellent example of total internal reflection, because that is what causes them to sparkle. They have a very small critical angle of 24.4º. This means that most of the light hitting is undergoing total internal reflection. Since diamonds are cut in a very specific way, light rays will bounce around inside the diamond before exiting, this causes the diamond to Sparkle!

Another way that total internal reflection is used daily is in fiber optics. Critical angles and total internal reflections are the only reason this works. Fiber optics is used in the communications industry for phones, computers, TV's, etc. They are also used in many other places such as in movies, in automotive, and in medical technologies. They are important in these respective fields to shine a light so that we can learn and find out more. If you are interested in fiber optics and want to learn more go to, http://en.wikipedia.org/wiki/Fiber-optic_communication

If you still don't fully understand the concept of total internal reflection you may want to check out these links: http://www.physicsclassroom.com/class/refrn/u14l3b.cfm

Also if you want to see a really cool demonstration of total internal reflection, click on this link, http://www.youtube.com/watch?v=s7w1Z1FCgwA


By: S.R and A.K